![]()
Joint Mobilizations 
Joint mobilizations are the skilled, passive movement to a joint directed towards restoring accessory, also known as arthrokinematic motion. The concave-convex rule is our guiding principle for joint mobilizations. When a convex surface is moved on a concave surface, the direction of joint glide is opposite of the direction of osteokinematic motion, whereas when a concave surface is moved on convex the direction of joint glide in is in the same direction of osteokinematic motion.
Indications, Contraindications, Precautions:
The indications for joint mobilizations include: improving accessory or physiologic motion, restoring normal articular relationships, symptom relief and pain control, enhancing motor function and reducing muscle guarding. Of course, there are absolute contraindications (Table 1) to joint mobilizations.

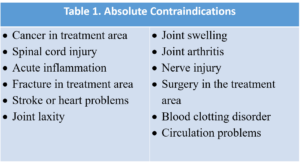
In addition, there are precautions (Table 2) that should be adhered to when performing joint mobilizations.


Mobilization Algorithm:
The movement impairment algorithm begins with an examination of the joint, followed by the answering of several questions.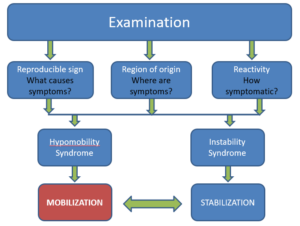
Is the sign reproducible? In other words, what are the cause of the symptoms? What is the region of origin? Where are the symptoms? And how reactive or symptomatic is the individual?
Based on the answers to those questions, you may determine that this is an instability syndrome which needs stabilization exercises or this is a hypomobility syndrome which needs joint mobilization.
If the answer is that joint mobilization is needed, then you need to decide what grade. Are you looking to impact the neurophysiologic aspects with joint mobilization? In other words, the firing of articular mechanoreceptors and proprioceptors, the firing of cutaneous and muscular receptors or the alteration in nocioception? Those would be performed with Grades I and Grades II.
However, if you’re looking for the mechanical effects, such as stretching of joint restrictions, breaking of adhesions, altering positional relationships or diminishing or eliminating barriers to normal motion, then you would want to perform Grade III or Grade IV mobilization techniques. Remember these techniques grades are not linear. You don’t need to begin with a Grade I and then progress to a Grade II, III or IV. You can start with a Grade I or II to address the neurophysiologic effects and then jump right to a Grade IV to embrace the mechanical effects. Likewise, you can create a mechanical effect with a Grade IV and then go back and address or alter the nocioception with a Grade I or II. So, there is not a linear relationship with these grades of joint mobilization.
 Joint Mobilization Grades:
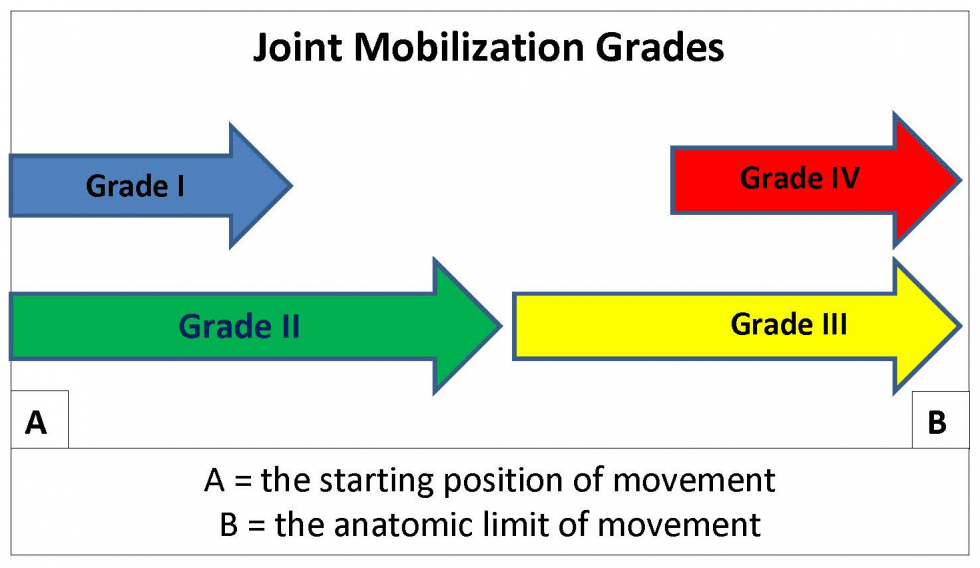
That being said, a joint mobilization should begin with a distraction technique. This is a perpendicular movement to the treatment plane. This separates the joint surfaces and makes joint mobilizations much more comfortable. So you should perform a distraction prior to performing a joint glide.
The joint glides as described by Maitland are based on the elements of tissue resistance. A Grade I is a motion that is of small amplitude in the beginning of the range, whereas a Grade II is a larger amplitude within the range but not reaching the tissue resistance. A Grade III is a larger amplitude up to the limit of range, and a Grade IV is a smaller amplitude at the limit of the range.
Psychomotor Performance of Joint Mobilizations:
We can know these rules about joint mobilizations and we can appreciate what each of these grades are, but the psychomotor skills are a whole different element. This presents a clinical problem. The clinical application of mobilization techniques has been reported to be quite variable and this lack of consistency can have a significant effect on patient recovery. There are also significant challenges in learning joint mobilization techniques and the novice clinician could benefit from quantitative, real-time feedback to assist them in learning these techniques.
 To date, no device is available to quantify joint mobility, i.e. arthrokinematics. That is, until now. There are several published studies on the reliability and validity of this innovative device. These studies are available on the website under the “Learn More” tab. The Mobil–Aider is a lightweight, portable, cost-effective device that provides real-time visual feedback in the performance of joint mobility. The deluxe version of the Mobil–Aider has 7 attachments for 5 joints to perform over 14 different mobilization techniques.
The Mobil–Aider has two settings: Mode A and Mode B. In the A mode, you can assess the endfeel, i.e. the maximal linear translation of a joint. This digital reading is held for 3 seconds to allow adequate time for reading. The B mode is a real-time measurement that allows you to appreciate where you are in the continuum of any given mobilization. For example, if a joint has 8 millimeters of motion and you wish to perform a Grade IV mobilization technique, then you want to get to perform small oscillations in the 7 to 8 millimeter range. The visual feedback of the small amplitude at the end of range will assure that you are doing a Grade IV joint mobilization.
In addition, the Mobil–Aider can help you when you’re performing a technique incorrectly. For example, if here you want to perform a wrist mobilization but you’re not at the joint line, the device will not translate and a reading will not appear. Once the joint line is properly lined up, the device will translate and a digital display will appear in millimeters.
For the novice clinician, appreciating the quality of a given endfeel can be valuable. Imagine giving a Mobil–Aider to a student or novice clinician to perform an inferior glide of the shoulder. You say to them, “Can you feel the capsular endfeel at 6 millimeters?” Now the clinician can translate the joint 6 millimeters and begin to feel that creep at 6 millimeters to know that that’s the end of the range for that person and that’s what a capsular endfeel feels like. This psychomotor feedback can help a person learn about joint mobilizations and improve the consistency of the techniques.
Dosing Joint Mobilizations: 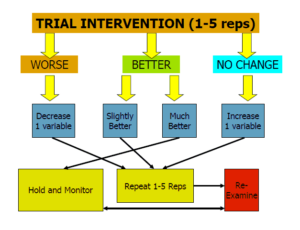
Finally, when you speak to performing these techniques, every joint mobilization should begin with an assessment of the current mobility. The initial intervention should a trial technique of one to five repetitions. And then it should be determined, how did the trial repetitions impact the patient? If there was no change, then increase one variable and repeat another one to five repetitions. If they were worse, decrease one variable and repeat one to five repetitions. If they are better by a slight amount, keep everything the same but repeat the one to five reps. If they’re much better, then hold and monitor. And then by all means, regardless of what happens, always re-examine the joint mobility.
Click on these convenient links for more information on: Mobil–Aider and joint mobilization techniques on iOrtho+ Premium Mobile App.
- Gulick DT. iOrtho+ Mobile App. DTG Enterprises LLC. 2020
- Gulick DT. FA Davis Publishing, Philadelphia. 2018
- Wise CH, Gulick DT. Mobilization Notes. FA Davis Publishing, Philadelphia. 2009