Strategy to Palpate Carpal Bones


Strategy to Palpate Carpal Bones
Palpation can be challenging when the structures being identified are as small or smaller than your own fingertip. This is the case of the carpal bones. Palpation in such compact areas requires a thorough knowledge of the relationship of the structures. Palpation should be a performed in a systematic manner. The touch should be firm and intentional. This process is modeled by a wonderful book known as the Trail Guide to the Body by Andrew Biel.
This blog will focus on 2 techniques to identify each of the carpal bones: a proximal to distal approach and a distal to proximal approach. Both will achieve the same result and is simply a matter of personal preference. It is always valuable to know 2 different techniques for any skill in case there is a reason one cannot be performed. More information on clinical tests for the wrist and hand can be obtained in iOrtho+ PREMIUM app, please visit: https://iortho.xyz/
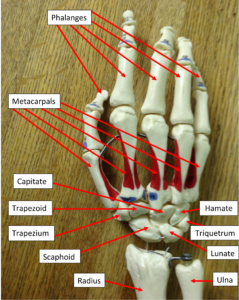 Let’s start by identifying the proximal row of carpal bones: scaphoid (boat-shaped), lunate (moon-shaped), triquetrum (3-sided), and pisiform (pea-shaped). Whereas, the distal row of carpals include trapezium (4-sided table), trapezoid (table-like), capitate (head-shaped), and hamate (hook-shaped). Regardless of the technique used, I find it is easier to palpate from the dorsal side because there is less soft tissue to navigate through.
When starting proximal to distal, one should identify the styloid processes of the radius (lateral) and ulna (medial). Please remember, the terminology used is always with reference to anatomic position. Thus, if the forearm is pronated, one needs to remember the radius is still considered to be lateral to the ulna even though it is closer to the midline of the body. Once the styloid processes are identified, one can move distal into the joint space. One will notice the medial joint space is slightly larger and is the home of the triangular fibrocartilage complex. On the lateral side, one will find the scaphoid bone between the extensor pollicus and abductor pollicus tendons, i.e. the anatomic snuffbox. If you roll over the extensor pollicus tendon, you will land on the lunate. Check back proximally to confirm the presence of the radius to know you are still on the proximal carpal row. If you take the wrist through passive flexion and extension, you will notice the lunate moves posterior with extension and anterior with flexion. This is simply another way to confirm you are on the desired structure. Grasping the scaphoid and lunate in a pincer grip and “wiggling” them in opposite directions may give you some insight into the stability of the scapho-lunate ligament, AKA the ACL of the wrist. This ligament is important for stability in gripping and weightbearing through the hand. As one continues to move medial, the next structure will be the triquetrum. That just leaves 1 proximal carpal bone unaccounted for….the pisiform. The claim to “fame” of the pisiform is that it is the distal attachment of the flexor carpi ulnaris (FCU). Thus, you need to supinate the forearm to access the FCU tendon and follow it distally to the pisiform, a small pea-shaped bone found on the anterior surface of the triquetrum.
Now that we have identified the proximal row, this will serve as a check-point for the distal row. So one can move from the respective proximal carpal to the distal carpal OR move to the metacarpal bones and work from distal to proximal. The key is to remember the relationship of the rays.
|
1st ray = thumb = scaphoid, trapezium, and 1st metacarpal |
|
2nd ray = index finger = scaphoid, trapezoid, 2nd metacarpal |
|
3rd ray = long finger = lunate, capitate, 3rd metacarpal |
|
4th ray = ring finger = triquetrum, hamate, 4th metacarpal |
|
5th ray = pinky = triquetrum, hamate, 5th metacarpal |
When moving from the scaphoid distal or from the 1st metacarpal proximal, you will find the trapezium bone. This column of bones makes up the 1st ray. When moving from the scaphoid slightly medial you will find the trapezoid. To confirm you are on the correct structure, find the 2nd metacarpal and follow it proximal. Just proximal to the base of the metacarpal will be the trapezoid. This column of bones is the 2nd ray. The 3rd ray is the long finger. This time we will want to start at the lunate. By moving distal, you will find the capitate and this bone can be confirmed by following the 3rd metacarpal proximally. Finally, the 4th and 5th rays share some common connections. The lunate and triquetrum both connect to the hamate distally. Likewise, the 4th and 5th metacarpal also share the hamate from the distal aspect.
The key to the palpation of the carpal bones is the frequent checking of adjacent structures to confirm accurate identification. The small size of these bones makes it challenging but by using check-points in all directions, one can palpate with confidence.
For more cutting-edge orthopedic information on iOrtho+ PREMIUM Mobile App, please visit the learning modules at https://iortho.xyz/
If you would like to learn more about the Mobil-Aider orthopedic measurement device to quantify joint mobility, please visit: https://mobil-aider.com/